Graphics Tab
The Graphics pane is used for setting the attributes of the the NoteAbilityPro graphics objects: lines, rectangles, ovals, curves as well as the color of text.
The three color wells hold the current color (or grayscale) for:
To change the colors in the wells, use the Show Colors... item in the Format menu or click on the border of one of the colour wells. Once you have selected your color in the Color panel, drag the color and drop it in one the wells in this pane.
The Graphics pane includes radio buttons to set whether rectangles and ovals are framed only, filled only or framed and filled. There is also a check box Has Fixed Size which allows the size of rectangles and ovals to be fixed so they don't change their shape as the rhythmic spine is adjusted. The Has Fixed Size setting must be made before the image is drawn. In the example below, the rectangle has fixed size, while the oval does not. Compressing or stretching the measure will distort the oval, but not the rectangle.
To change the characteristics of an existing graphic object, select the image, choose the desired settings in the Graphics pane and click the Change Graphics button.
|
 |
Lines Tab
NoteAbility supports 20 different line types, each of which can be solid or dashed, can be drawn at any line thickness and colour (the colour is set in the Graphics tab), and can be set to any point size (using the Image Size slider in the Image Attributes pane.)
To enter lines in your score:
To change the attributes of lines that have already been added to your score, select the lines on the score (using the Selection or Select Score tools), then choose the new line type, line width, whether they are to be solid or dashed, and click on the Change Line Type button.
To change only the line width of selected lines, set a new line width and use the Change Line Width button.
It is also possible to change the image size of a line by selecting it, choosing a new image size in the Image Attributes pane and clicking on the Set Size button. Changing the image size (or point size) of a line has different effects depending on the line type. Generally, the size of extended lines or the size of the arrow head is altered with different image sizes. The line thickness is not altered since that attribute is set with the Line Width slider. In the example below, the four different line types are shown at 24, 36 and 48 point sizes:

Pedal Lines Tab
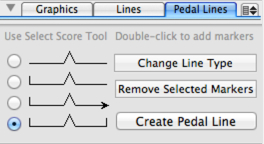
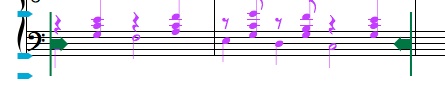
The Pedal Line tab is used for adding piano pedal indications below a staff. Once a pedal line has been entered in your score, you may add additional pedal change indications along the pedal line. The procedure for entering pedal indications to your score is as follows:
|
|
Each pedal change marker added to the pedal line can be moved along the pedal line. If you move the pedal line past the beginning or end of a system, it will be moved to the previous or next system. All pedal change markers are adjusted when your score if formatted. If you want to remove a pedal change marker, select it using the Select tool and click on the Remove Selected Markers button on the Pedal Lines pane.
If you wish to change the type of pedal line you have entered in your score, select the beginning of the pedal line, select the desired pedal type by clicking on the radio button in the Pedal Lines pane, and click on the Change Line Type button.
Tuplets Tab
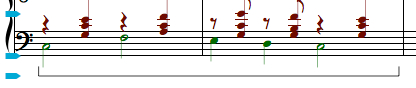
The tuplet tab is used for creating nested tuplets (tuplets within tuplets.) In a situation where you need a tuplet such as a triplet within another tuplet such as a triplet or a quintuplet, you can use this panel to build your nested tuplet. The figure below shows an example of a nested tuplet.
In this example, the base tuplet is an eighth note quintuplet (5 eighth notes in the time of 4 eighth notes) and the nested tuplet is a triplet where 3 notes appear in the time of 1 of the base units. Before creating nested tuplets, you need to determine the base tuplet (i.e. the number of notes that will appear in the time of how many of those notes, and what rhythmic value the base tuplet will have. For the nested tuplet, you need to know how many notes should appear in place of how many of the base tuplets.
Here are a few more examples:
| Base tuplet | Base Duration | Nested Value | Appearance |
|---|---|---|---|
| 3 in the time of 2 | Quarter note | 3 in the time of 1 base unit |
|
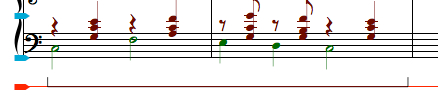
| 7 in the time of 6 | Eighth note | 5 in the time of 2 base units |
|
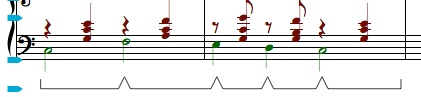
| 8 in the time of 7 | Eighth note | 5 in the time of 1 base units |

|
The procedure for creating nested tuplets is as follows:
Each tuplet can be adjusted and (if desired) the ratio can be displayed and the bracket hidden.
|
|
Menu items
The pull down menu located at the top-right corner of this pane refer to Import Graphics - these are graphics files that have been dragged and dropped onto the score or inserted using the Image Library Panel.
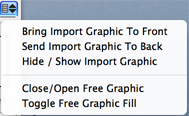
| Bring Import Graphic To Front | bring selected import graphics in front of staves and other music images |
| Send Import Graphic To Back | send selected import graphics behind staves and other music images |
| Hide/Show Import Graphic | hide or show the selected import graphics |
| Close/Open Free Graphic | Switch selected freehand graphics from being closed to being open |
| Toggle Free Graphic Fill | Switch selected freehand graphics from being framed to being filled |
The Bring To Front and Send To Back menu items. refer only to Imported PDF, EPS, TIFF, JPEG, PICT, or GIF files. You can use these buttons to cause the graphic images to be drawn (and printed) before or after score is drawn. The example below shows an imported TIFF image (a stop sign) which is placed once in front of the score, once behind the score. The third copy of this image has been hidden by selecting the image and clicking on the Hide/Show Import Graphic menu. This image will appear when the document is printed.
|
|
See also


© Keith A. Hamel 1998-2005 - All Rights Reserved |
 - All new graphics are drawn using the settings in this pane.
If you change the settings in order to alter an exising graphic image, you may want to revert the settings before adding more images.
- All new graphics are drawn using the settings in this pane.
If you change the settings in order to alter an exising graphic image, you may want to revert the settings before adding more images.